
so i was searching on etsy one night for elmo ideas and came across elmo cupcake toppers. and i thought hey, i could totally make those! so i did! it took some time, but it was worth it! i also made number 2 toppers because i thought those would be cute too, and they were. not as cute as elmo though! the ones i saw on etsy were made with cutting machines (a cricut or something like that), so they looked a little nicer and cleaner cut. but i think mine turned out just fine.
what you'll need:
scrapbook paper (i used the leftovers from the birthday banner. you'll need red, white, black, and orange, and for the 2's i used pink and blue)
elmo stencil (i made one)
number 2 stencil (i made it just like i made the letter stencils for the birthday banner. i just made it smaller)
pencil
scissors
elmer's glue
sucker sticks (you can get them at a craft store)
hole puncher
tooth pick(s)
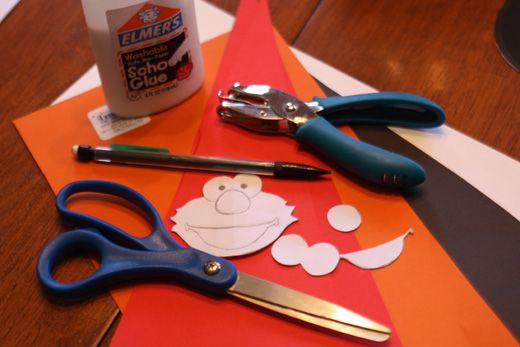
we'll start with elmo. i made my own stencil, but here's a picture of it. you may be able to print it and cut it out and have it work for you. i cut out the whole thing and then traced the eyes, nose, and mouth onto another piece of paper. i made the nose a little more oval shaped than the stencil and i also made the sides of the mouth a little thicker because it was easier to cut out. you can adjust it a bit to suit your liking!

now comes a lot of tracing and cutting (remember, flip it over so the pencil marks are on the back side. for elmo, it's not that big of a deal because it's pretty symmetrical). i honestly don't know how many elmos i made. it was a lot though. i made extras just in case i needed them for something else. i just traced a whole bunch and then sat and cut them all out.
to glue, i did it in this order: eyes, nose, mouth, eyeballs. i put a little dab of glue on elmos head and smeared it around with a tooth pick for the eyes, and for everything else i put some glue on the part itself because all of it needed to be glued down (the top part of the eyes hang off so you can't put glue all over the eyes). i glued all the eyes on, then all the noses, and so on. it was a little easier that way. to make the eyeballs, i just used the hole puncher and used the black scrapbook paper. easy peasy.
lastly, i glued the sucker sticks to the back. not too bad, and really cute!!


that's just a portion of the elmos i made. i wish i had taken a picture of them all. oh well.

now on to the 2's. much easier, actually. just cut your stencil and trace it (flip it so the pencil marks will be on the back (are you getting tired of me saying that??)). then cut and glue the sucker stick to the back. not bad at all!
the finished products.

hope this was helpful! let me know if you have any questions! have fun :)


4 comments:
You are so talented :)
This was SO helpful!!! I plan on making very similar cupcake toppers for my daughters party, thanks for the tutorial!!
These are so adorable. I like the photo of all the Elmos together.
These are AWESOME! Luci's 1 year birthday was Elmo...I totally could have used this tutorial! Love this Bailey!
Post a Comment